You can use the Checkpoint® Tools set of predefined and customizable tickmark symbols to help organize comments and workflow processes in any of your Checkpoint Tools documents.
Note: Only defined tickmarks will be displayed.
To use the Tickmark toolbar:
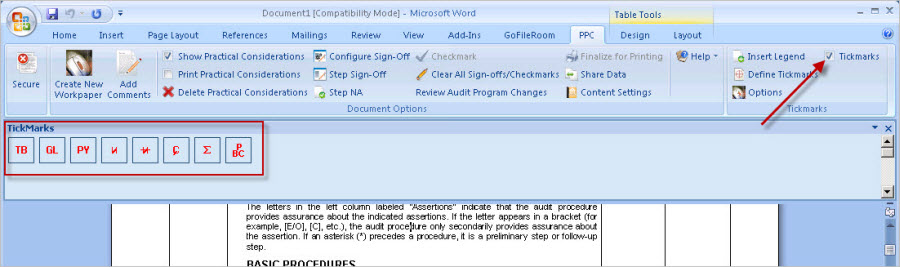
Select Tickmark Toolbar from the PPC tab at the top of an opened document. The Tickmarks section will display in the top right of the ribbon menu.
The Tickmark Toolbar can be docked to any edge of the Word or Excel window by selecting it with the cursor, and dragging, or the toolbar can be un-docked by dragging it away from the edges.
To add a tickmark to a workbook, select the cell or field where you want to add the tickmark.
Select the checkbox next to Tickmarks to display the available tickmarks:
Select a tickmark to insert into your document.
Note: In Excel, you can choose the alignment of your tickmarks by selecting Options from the Tickmarks section. In the Options dialog, select either the Left or Right option, and then click OK.
To add a Tickmark Legend to a workpaper:
Select Insert Legend from the Tickmarks section.
In the Insert Legend dialog screen, select the check boxes for each tickmark symbol you want to include in the legend.
Click OK.
You can also define individual symbols to customize your set of tickmarks for your unique needs. To define tickmarks:
Select Define Tickmarks in the Tickmarks section.
Enter a description into the field for the tickmarks you want to define.
Note: While some tickmarks are provided with predefined descriptions, these can also be edited.
To remove the Tickmarks Toolbar, click the
Close icon "X" in the
top right corner of the tickmarks palette.